Thursday, March 10, 2011

Laundry Room progress (2)

I wanted to post an update on our laundry room--it's coming together soo nice! All the labor intensive stuff is done..new floor, beadboard, chair rail and base trim. The floor has even been cleaned, waxed and buffed thanks to my amazing hubby! (Flooring is Armstrong VCT tile in Classic Black and Cool White). We moved the washer and dryer upstairs a little over a week ago, and I am in heaven! Main floor laundry is soooo much better than having to go downstairs! Love love love! It was definitely worth all the work that has gone into it (mostly by hubby--not me!)

A few pics...

Looking in the door:
IMG_5692

IMG_5691

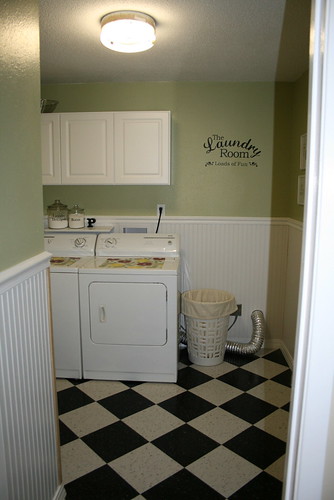
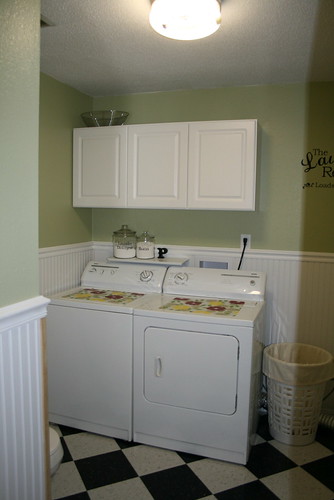
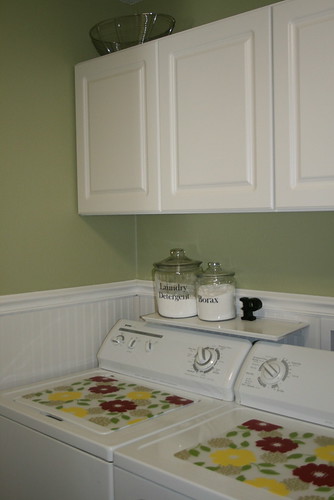
New cabinets, shelf from Menards, and glass canisters from Target. I used my Silhouette to make the Vinyl lettering. :)

IMG_5694

New toilet!

IMG_5693

I made the wreath--it's burlap, a cheap dollar store wicker wreath, and hot glue! I am hoping to post a little how-to in the next day or two. The frame was once gold, and had a nice Tuscan scene framed in it. I removed the glass, and picture, and spray painted the frame matte aluminum. LOVE!

IMG_5697

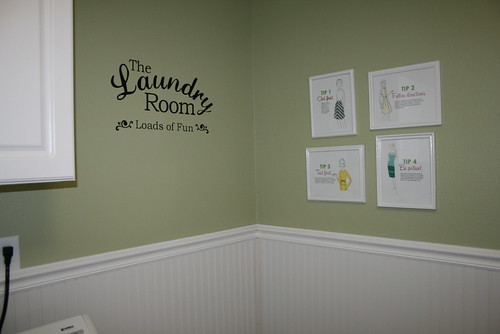
I posted about this pictures and this vinyl here.

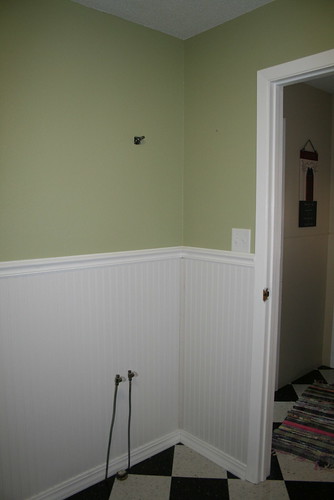
We want to put a utility sink, mirror, and lightstrip in this corner eventually...
IMG_5700

And Dustin is also planning on putting in a countertop to the right of the dryer, so I will have a folding area! I can't wait! But for now it's useable, and that's the most important thing. It makes doing laundry just a teensy bit easier, lol.

A few notes:
Wall color: Key Lime Pie from Dutchboy
Beadboard color: Grey Whisper from Dutchboy
Flooring: VCT tile from Armstrong, Classic Black, and Cool White
Linking up to these parties:

Board and Batten Reveal!

I should have gotten this posted last week, but I just couldn't find the time to take pictures! I was crazy busy; Dustin was out of town, and I was preparing for McKenna's birthday party.

But, better late then never right?

This has probably been one of my favorite projects to date! I gave you all a sneak peak here. I am soo proud of how it turned out--this was such an ugly, blank wall before. But it has so much character now! And the best part, is I did most of the work myself! I had to have Dustin help me with the math to get the batten spacing even, but I did all the nailing, and even some of the cutting. And then I did all the painting myself too ;).

Here is the before again (this was taken as I started to paint the top half of the wall)
IMG_5388


And, as it looks today!
IMG_5717 copy


Profile view
IMG_5715 copy


I used my Silhouette and their premium frosted vinyl to cut out the words for the mirror. I had just the mirror hanging for the last few days, and it was just too blank--it needed something; and I think the frosted glass look is just perfect!
(It's hard to really capture the mirror effect--but it really is a mirror!)
IMG_5713


Speaking of the mirror--I DIY'd that as well...it started off as this:
IMG_5470

I took off the hooks, filled them in with wood putty, and then spray painted it white. I used a sanding block to lighly distress it when the paint had dried--and I really like how it looks now.


Overall, I am so happy with how this wall turned out. It has become a focal point in the house, and makes me smile everytime I walk by it. Even Dustin is impressed! :)

A few notes:

Previous wall color: Grand Hotel Mackinac Blue from Valspar
New wall color: Aqua Bay from Dutchboy
Board and Batten paint color: Ultrawhite from Dutchboy
Board and Batten materials: I originally planned on just using pine boards..but when I got to Lowe's they were out of 10' 1x4s. So I bought primed MDF instead--which was sooo nice to work with. I used 1x4's for the boards and 1x2's for the battens. Total cost was around $35.


Linking up to 1 Month 2 Win It! Wish me luck!

One Month To Win It


And

Tuesday, March 8, 2011

Happy Birthday McKenna, and her rainbow cake!

Today is my baby girls birthday! I can't believe she is 4 already. We had her party on Saturday, and she was spoiled rotten as usual. She requested a rainbow party, so I did my best to accomodate! Her birthday cakes was probably one of the easiest I've done yet, but definitely had the biggest wow factor!
I started with a basic vanilla cake recipe; this one to be exact. The original recipe yeilds 12 servings, or 1 9" cake round. For the rainbow cake, I needed more cake, so I adjusted the recipe for 36 servings. I mixed up the batter, and then divided it by weight into 6 bowls. I colored each layer a different color, and then baked--each layer took approx. 15 min.
For frosting I used the Wilton buttercreme recipe. I took the original recipe x 3, and had enough frosting for the cake, and 24 cupcakes..with a few scoops leftover!
So, enough talk, and onto some pictures!
IMG_5539_1 copy
Birthday Girl
(I also found out that hubby hasn't leveled my oven--each layer came out uneven...I tried to stack them so it would be less obvious, but the top layer blew my cover!)
IMG_5560
IMG_5557
IMG_5608 copy
The big reveal! (and my camera was set on the wrong settings :( Sorry the pics are so dark!)
IMG_5616 copy
IMG_5621 copy
Overall, I love how it came out! The cake tasted great--like a big sugar cookie--and McKenna loved seeing the rainbow!
Linking up to these parties!
Photobucket

Thursday, March 3, 2011

McKenna's Birthday Rainbow Feliz Party Dress

Wow..that's a mouthfull!
So McKenna turns four next week. FOUR! I can hardly believe that my baby girl will be four. It's amazing how fast time goes by anymore. I swear I blinked and here we are today.
Kenna is my girly girl--she loves dolls and dresses, all things pink and glittery, princesses, rainbows and unicorns. So it was no suprise to me when she told me she wanted a rainbow birthday party. And I was happy to oblige--I'm drawn to rainbow colors myself--just look around my house--yellow coffee table, purple wall, aqua kitchen, red accents, green laundry room. I love color!
I have always made McKenna a special birthday dress for her party. The past two years has been the Farbenmix Feliz pattern, which is now available in the book "Sewing Clothes Kids Love." It is my favorite favorite dress pattern, and Kenna's too! She loves to twirl in them, and always calls them her princess dresses. I really looked for a different pattern to use this year, but the Feliz just calls out to me. I've probably made a dozen or so of them between the girls--so I'm pretty much an old pro at sewing it up, haha!
I started looking around for fabric, and fell in love with Riley Blakes, "Feeling Groovy" line--which must be no coincidence--I LOVE Riley Blake fabric--Kenna's birthday dress last year was made from some, Jackson's crib set is made from her All Star line, the Christmas stocking and advent calendar I made this year were from her Colorful Christmas line, and the girls' Christmas dresses from last year were made from RB fabric too! I love all of her designs--they are so fun and colorful, and perfect for kid stuff. And the Feeling Groovy line was perfect for a rainbow dress!
Anyway, onto the pics right?!
IMG_5496
IMG_5501
IMG_5503
The reason why she loves this dress so much....twirl factor!
IMG_5510
Back Detail
IMG_5521
And just because she's cute!
IMG_5528
Linking up to:

Wednesday, March 2, 2011

Birthday present for McKenna

Since hubs is out of town this week, it means that I stay up super late working on projects--it's easier for me to sleep without him when I'm dead tired I guess. Last night I was up until 1 am, watching Bravo (love the housewives--all seasons!), and working on a birthday pressie for McKenna.

I finished it though--and the exhaustion this morning was totally worth it! She will love it! I would like to make something to go with it...but I'm not sure what yet. Hopefully I'll think of something soon, as her party is on Saturday!

Pattern is Mermae from Bit of Whimsy Dolls. I love all her patterns, and have made many of them. They go together easy, and fairly fast--I started Mermae at 10:30p or so.... The fabric is Riley Blake, Feeling Groovy, and matches her birthday dress I made for her (that I still need to post about!).

IMG_5480

Isn't she adorable!

Tuesday, March 1, 2011

Board and Batten sneak peak!

As if I didn't have enough projects on my plate already, I decided to start another one. I've been seeing board and batten posts all over lately, and it's been nagging me like an itch I need to scratch. Finally last week, I knew where I wanted to incorporate the look into our home.

We have a very long, odd wall that is part dining room, part hallway. It's big and blank, and I just had no idea what to do with it. But board and batten would be perfect!

IMG_5388
Before

I decided to repaint as well--the new wall color is Aqua Bay from Dutchboy, and the board and batten will be Ultrawhite from Dutchboy to match our trim (that someday we will get put up! details..haha!).

Hubby and I stopped and got wood on Friday night, but weren't able to get it up until Sunday--we spent most of the weekend stripping and re-waxing the VCT tile in the kitchen, entryway, and laundry room--we also got the laundry room 90% finished! I'll post more on that in a bit!

Anways, we put the board and batten up Sunday. I insisted on helping with this--so I made some of the cuts with the miter saw, and Dustin even let me run the nail gun (which is a little intimidating!). I let Dustin do the hard part--the math to calculate batten placement! But even with me helping, we still had it up in under 2 hours. In hindsight, I should have painted everything before, but live and learn right?!

Here are a few progress pics--I should have finished pics later today!

IMG_5434
Board and Battens up


IMG_5436
Profile View
IMG_5438
One coat of paint on...one more to go.

For the boards we used two 1x4's. The battens are 1x2's and we also added a 1x2 ledge on top. Lowes didn't have any 10 foot 1x4 pine boards, so we bought primed MDF instead--which increased our price slightly, but overall gaves us a better finished look I think. Our wall is 8', 9.5", and the battens are 40" each--and our total for wood was around $35.

Now to get that last coat of paint on! Hubs is out of town this week, and McKenna's 4th Birthday Party is on Saturday--which means I need to clean house, bake cakes and cupcakes, and get ready for a party. Should make for a fun week! ha! Let's just hope I'm still standing when it comes time for the party!


Paint Chip Wall Art

This is not a new idea--I've seen it floating around blogland for awhile now..but like most things, I'm late to the party! I saw this post over at Life, Crafts, and Whatever, and knew I wanted to copy imitate her.

I scooped up a ton of paintchips from Lowes, and had hubby cut me a board to size--we even already had the wood, score! My finished piece is 24"x24". I cut my paint chips down to 2" squares, so I needed 144 of them. Then I used spray adhesive and adhered them to the board. I followed that with 2 layers of mod-podge, and 2 layers of stain--when applying the stain, I brushed it on, and then wiped most of it off. It left the piece looking more dimensional, or "old-looking" as my 5 year old said! ;)

All in all, super easy project, and also super cheap--the only thing I had to buy was spray adhesive, which is a crafting staple, and sure to be used for other projects.

IMG_5440 copy

IMG_5443 copy

What do you think? Does it work?


A FEW TIPS IF YOU WANT TO MAKE YOUR OWN:
1. Paint your board black before gluing down your paint chips--this helps hides any imperfections in lining up your chips.
2. Use stain! Not glaze. It will NOT give you the same look. Using glaze ends up just looking dirty--using stain makes it looked aged.
3. Take your time and make sure all your squares are cut the same size.
4. Layout your chips before gluing them down. It also helps to number the backs. Since I was going for a random appearance, I just stacked them up in order, and it worked for me. But if you want a more precise look, you would definitely want to number them so they stay in order.
I hope this helps someone, and hope that you try it! You can beat the price for custom artwork!