Friday, April 25, 2014

Using your coverstitch machine to do an elasticized waistband (Tutorial)

For Christmas this past year my awesome hubby got me an item I've been dreaming about since I started sewing--a coverstitch machine!  When I first pulled it out of the box I was immediately intimidated--and since we were moving just a few days later I quickly shoved it back into the box and resolved to learn about it "later."  

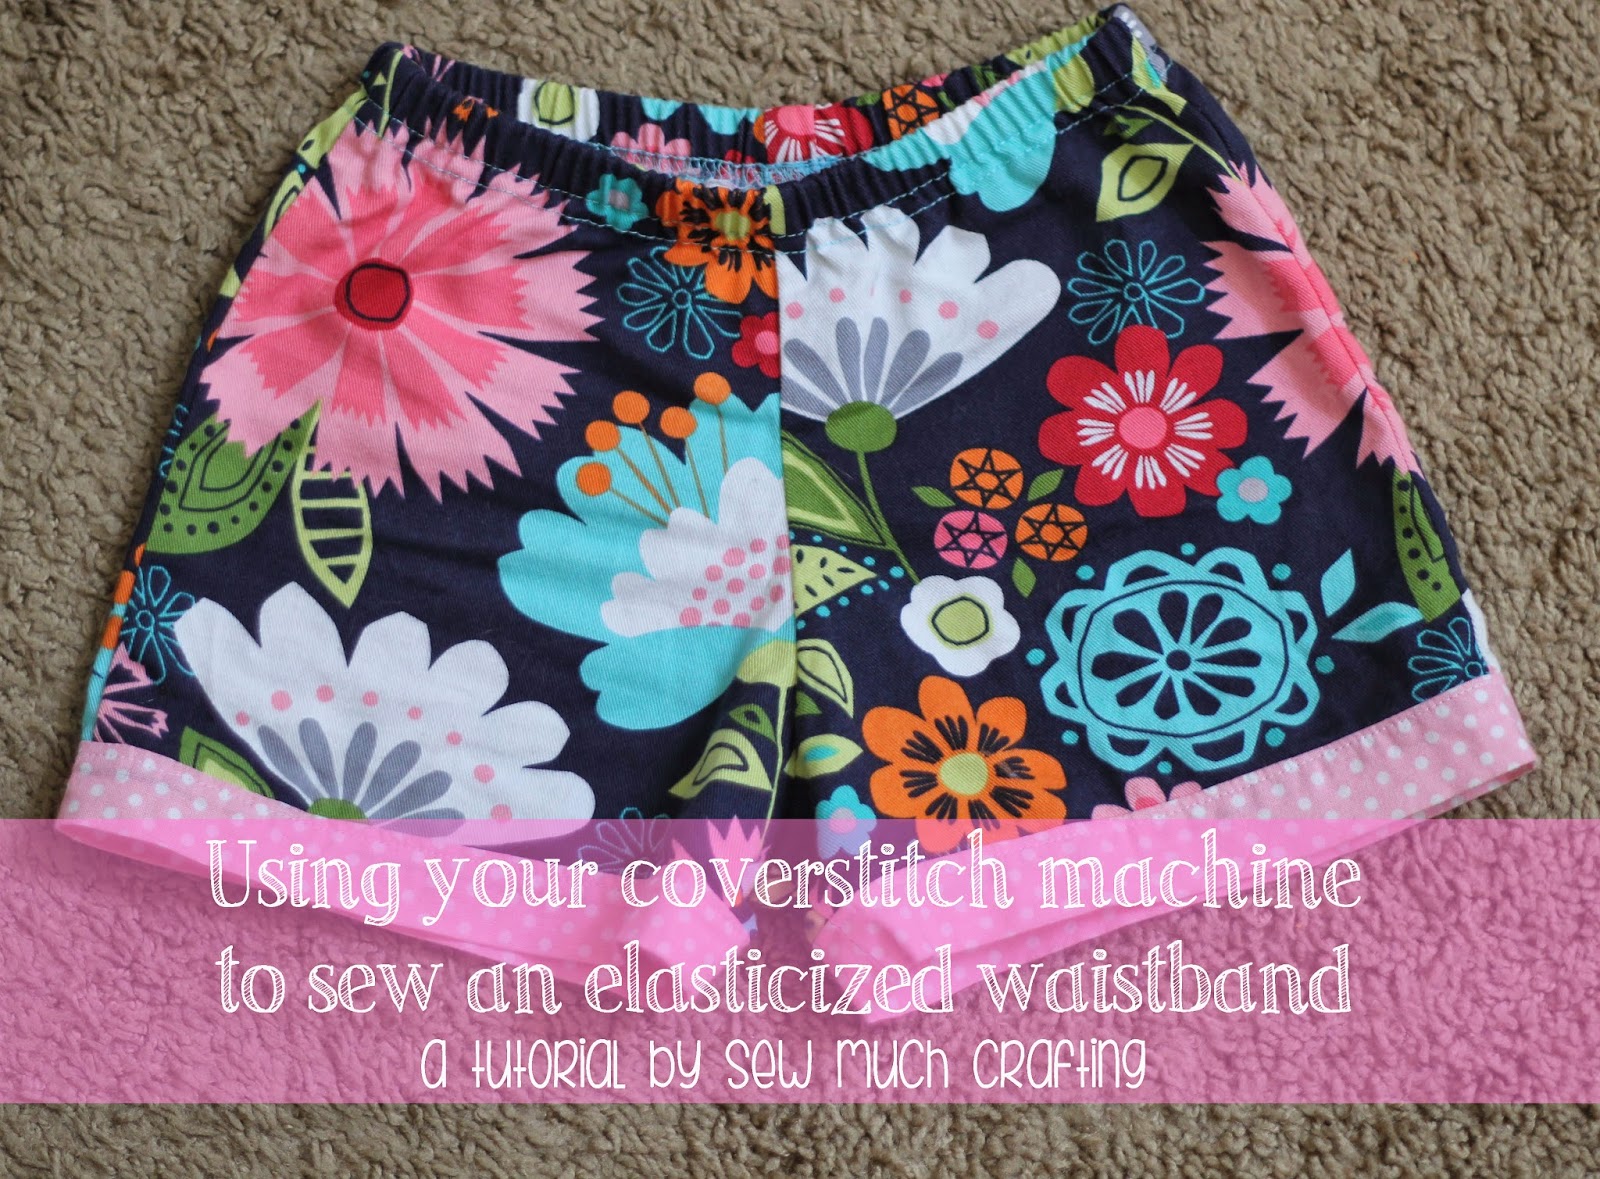
Once we had settled into our new house, and my sewing room was unpacked, I set up my new machine, and was determined to use it!  I turned to google and was disappointed in the lack of tutorials and information on using a coverstitch machine. I've pretty much learned by trial and error, and still would not consider myself and expert by any means! But I have figured out how to do a nice waistband using my coverstitch, and wanted to share the technique with you all as well.  Using this method is so much quicker than the usual casing method I've been doing for the past few years.

The machine I have is the Brother 2340CV.  I have it set up for a 3 thread coverstitch for this application.

The first thing you will need is an almost finished pair of pants or shorts. I'm using a pair of shorts I made for Cecelia using the 30 Minute Shorts Pattern by Lily Bird Studio.  
 Step 1: Fold over the waistband allowance and press.  In my case I'm using a 3/4" allowance.
Step 2: Cut your elastic to length (I'm using 1/2" elastic), and then overlap the ends and sew together to form a circle.
Step 3: Take the elastic circle you've just sewn and using a fabric marker mark each quarter section.
Step 4: Now is the best time to add your size tag if you choose. You will want to slip the elastic under the casing, then the tag and tack it down.
Step 5: Pin the elastic inside the casing, matching the marks you made with the seams on the pants/shorts.  Stretch the elastic to fit, and pin, pin, pin!
Step 6: Now the fun part!  Take your pinned pants/shorts and slide them under the presser foot on your coverstitch, right side up.  Using the guide on the machine, line up the edge with the right line.  You want to fully encase your raw edge on the underside, and catch the bottom part of your elastic in your stitches.  I'm using the Brother 2340CV,  and with a 3/4" allowance, the first guideline is the one you want to use.
Step 7: Sew!  For my machine I use the handwheel to do the first 2-3 stitches.  Make sure to remove your pins as you sew, and stretch the elastic with the waistband.  Go slow, but steady, and try not to start and stop the machine.  When you get back to your starting point, overlap the stitches for 1/2" or so.  Then cut your threads and tie off. (For my machine I cut the top threads, then pull them to the bottom side, and then cut the bottom thread. Then I knot the threads on the underside.)
 
Step 8: (Optional) Use FrayCheck or something similar on your starting and stopping points. I do this as a precaution in case my knot would come undone.
Step 9: Enjoy your finished pants/shorts! 
I'm definitely still learning how to use my machine, but so far I'm loving the uses it has.  It is great for hemming shirts, skirts, etc, and of course waistbands! I would love to hear what you use your coverstitch machine for too!  

As always, Happy Crafting!


Linking to these great parties:

Love Grows Wild

Tuesday, April 8, 2014

Kindle Pouch

This was one of the funnest projects I've done in awhile.  My niece turns 9 in just a couple weeks, and loves to read, so when I saw the Kindle 6" go on sale a few weeks ago on Amazon, I jumped on it!  But of course I couldn't just send the Kindle to her...it needed a pouch or a case or something!  I searched etsy and google for the perfect pattern, and couldn't find a pattern for a case that suited my needs, so I ended up ordering a book style case from Amazon, and am very pleased with it.  I then focused my search for a pouch pattern, and found the perfect one, from one of my favorite designers, Michelle Patterns.  I used the More Pleated Pouches Pattern found here.  The pattern included instructions and pattern pieces to make several sizes of pouches--I went with the Tall pattern, and it fits the Kindle with the case on perfect!  I used fabric I found at Joanns (part of the Doodles collection), and I think it turned out so cute!!  

Here are a few pics! (Oh, and ignore the scuzzy tile--we are in a rental for a year until we buy a house!)


 I also made her a cute little luggage tag--her big birthday present from her parents in a plane ticket to come visit us this summer, so I thought this was be perfect. I used the Luggage Tags pattern from Birdiful Stitches, which can be found here.

That's it for today! Happy Crafting!

Sunday, December 8, 2013

The Playhouse Dress (and some news!)

playhouse dress 5
The Christmas season is upon us, and I'm in full blown Christmas sewing mode...I've just been really terrible at sharing my progress!

In my defense, things have been a little hectic around here. I know I said awhile back I'd be able to share some exciting news soon...and the time has come!


In January 2014 we are moving! We are relocating from South Dakota to Nevada! It's going to be quite a change, but we are so excited! This season has been a little more stressful because of the impending move, but we are making do, and very excited about the future. Christmas is going to be a little crazy this year, as we will literally be packing up right after Christmas--we have the u-haul reserved for Dec 31--and plan on pulling out of SD on January 2nd.


playhouse dress 2

Which brings me to this little dress. I love making my girls' Christmas dresses...but I also hate spending time on something that only gets worn a couple of times.  The last couple years I've tried to make things that were more wintery in spirit, instead of just Christmas, so that items can be worn a full season. This year was a bit more 'challenging', only because our 'season' will be changing much sooner--Winter in Nevada is not quite the same as winter in South Dakota! :)
snowman dress 1

Enter The Playhouse Dress from Fishsticks Designs.  If you've read my blog for any length of time, you should know I love Bonnie's patterns. They are just my kind of sewing--easy, fun, and practical. I love making things my kiddos can wear again and again.  I love making the frilly, ruffly, special occasion outfits too, by my real passion is in creating things that are meant for everyday wear.  And this pattern fits the bill perfectly.  
 playhouse dress 4 
  My little Cecelia is now 15 months, and never sits still, so she's pretty much impossible to photograph! But we tried our best. She is such a busy-body, and this dress is perfect for this age. It's comfortable, but looks adorable. I love the curved bodice and full skirt--it makes it look dressy without sacrificing comfort.  The puff sleeves are also the perfect touch.  With this pattern you can use a combo of knits and woven fabrics, or all knits, as I did for this dress.  I used cotton interlocks in pink and blue, and added a cute lil' snowman with heat transfer vinyl and my Silhouette cutting machine.  I also added a glittery snowflake to one sleeve.  Cecelia is wearing a 2T in ready-to-wear clothing, so for this dress I cut out the 24 months/2T size, and as you can see, the fit is great. It has just enough growing room without looking huge on her.  The pattern was easy to sew and only took a couple of hours. Bonnie's instructions are always very good, and include many pictures. My favorite part about Fishsticks Designs Patterns are the patterns themselves. I really like how the PDF patterns print and are assembled. I know some sewists aren't a fan of nested patterns as the initial printing and taping can be daunting, but I find it so much easier to make changes to a set of nested patterns than just single sized pieces.
playhouse dress 3
This dress will be perfect for our low-key family Christmases, but can also be worn all winter long--and because I did short sleeves, it should work in the desert just fine! :)

I'm working a cute little American Girl Doll tutorial that should be up later this week, so I hope you'll stop by!  

Happy Sewing!

Monday, November 4, 2013

Lazy Days Kitty set


Another super long blog hiatus...oops.  I've been swamped since coming back from Sewing Summit in September (which was AMAZING BTW.  I've given up hope on a recap, but it was one of the best things I've done, ever.  I am praying I can make it work out to go again next year!).  First off, we moved! We sold out little acreage, and have moved into a temporary rental in town.  It's been an adjustment--but mostly positive. We are right next door to the kids school, and our church...so those are both nice bonuses!  We have some big things in the works, but I'm not quite ready to share yet...soon though!

The picture above is from Halloween--I totally failed this year at making any costumes, but they were still cute anyways! Braydon was a gladiator, Ashlee a princess, McKenna was a kitty, Jackson a knight, and Cecelia starred as herself (in skeleton PJ's).  It was pretty low-key this year--we just went trick or treating around the neighborhood, but the kids still had a blast.  Jackson only made it to about 10 houses though, before decideing his legs hurt and he would rather go home and pass out candy. :) So Dustin took the big kids, and Jackson, Cecelia, and I stayed in the rest of the night and handed out candy--a first for me since being a "grown-up"! Living in the country we never had any trick-or-treaters, plus we were always out with our kids.  This year was a fun change.

I have managed to get a bit of sewing done though....I've just been horrid at getting pics done!  Maybe someday I'll really get the hang of this blog thing...haha.

Today though, I do have a couple pics to share.  I recently sewed up a Lazy Days Lounge Set from Fishsticks Designs.  I really love all of Bonnie's patterns, and this one was no exception! I made the size 24 months/2T for Cecelia, which proved to be a little big, so next time I may size down.  But she has plenty of growing room in these!  I used a heathered pink knit with kitties on it from my local sewing shop, and used gray ribbing for the bindings and cuffs. 

Cecelia is such a little stinker now, and is impossible to get to sit still for pictures--but I did manage to snag a couple! She loves wearing hats, and this one was a perfect match! (made by the lovely Josie from Payley Knits and Crochet )
lazy days kitty 3
Like all of the Fishsticks Designs Patterns I've used, this one sewed up super easy, and fairly quickly.  Bonnie's instructions are always very clear, with lots of pictures, and make for good afternoon sewing projects. I never seem to have more than a couple hours to spare at one time, and I love when I can walk away from that time with a finished product.  Cecelia loves her new jammies, and I can definitely see making more of these in the future--they look so comfy!

I have also been working on some Christmas presents, and I can't wait to share them soon! Until next time!

Happy Sewing!

Thursday, September 12, 2013

Three times the fun...

 
Just wanted to share a couple quick photos of the dresses I made for my three girls for my brother-in-law's upcoming wedding.  I usually steer clear of making 'fancy' clothes for my girls--satin, crepe, chiffon--all those fabrics scare me!  But I was determined to tackle my fears and make three beautiful dresses for this very special event.  I am so glad I did too!!

The pattern I decided on was the Maddie Dress from Lily Bird Studio.  I spent a lot of time deciding on fabics--the main wedding colors are teal & black. Dustin is the best man, I'm a bridesmaid, and Braydon (our oldest son) is a groomsman as well--so I knew I wanted the girls' dresses to at least coordinate with us.  I couldn't find anything in the right shade of teal, so decided to go with this eggplant-purple color. The purple and teal really compliment each other, and will look great in a fall wedding (I think anyways!).  All the fabrics are from JoAnns--I used purple glitter satin (the poly stuff) for the bodice, black satin (again, poly), and three layers of crepe (poly) for the skirt.  
Overall the dreses actually were not that hard to sew up.  I used my walking foot, and the fabrics were pretty easy to work with.  I had a little trouble hemming the crepe--and I'm not totally happy with how they look...but I doubt anyone but me will ever notice!  Ashlee's dress is a bit shorter than I would like, and if I had any extra crepe I would probably add another layer to her skirt...but I don't so it will just have to work, since the wedding is Saturday! :) I'm really happy with how they turned out, and even prouder than I overcame a "fear" that I had.  I definitely don't think I will start making dresses on a regular basis out of these fabrics, but at least I know I CAN do it!

Happy Thursday!


Wednesday, September 11, 2013

A couple of pouches...

I can't believe Sewing Summit is only a week away!! I'm so so so excited to be going!! I've been working on a few things this week for the summit, and wanted to share.

I joined a swap group on Flickr for the summit--we are each swapping a pouch/mini quilt/cushion.  It's a secret swap, so you know who you are creating for, but not who is creating for you! So far the finished items that have been posted are AMAZING! There are so many talented seamstresses out there--which makes me even more excited for Sewing Summit--I can't wait to learn and see new things!

For my partner I went back and forth in my head about several ideas, and finally decided on a Hexagon pieced pouch.  Specifically the no. 236 The Melinda Zipper Pouch from ithinksew. I was a little wary of the hexagon piecing, but it actually went together very smoothly, and pretty quickly!  I spent the most time cutting--I really tried to be meticulous when cutting out all the hexies. And it paid off; sewing was really easy.  I also marked the 1/4" seam allowance on the wrong side of all the pieces using a fabric marker, which really helped too.

The only thing I added were the little zipper tabs on the top--I just think they look cute, and a little more finished.


 It turned out a bit smaller than I was picturing, so I decided to make a second pouch for my partner.  I made a little business card wallet using a pattern from Michelle Patterns.  I love her patterns--they always turn out great and the directions are easy to follow.  
It turned out really cute, and was really fun to make--plus easy and fast! Win win! I made two in less than an hour (I made them assembly line style).  I needed one for myself of course too! 

And of course I needed some business cards to put in it!  I made some up in photoshop and had them printed at OfficeMax, and I'm super thrilled with how they turned out! I didn't want to spend a ton, and I needed them quickly, so OfficeMax was the perfect choice.  It cost me $16 to get 100 cards, and they had them printed and cut faster than I could even drive to pick them up!  That's service!

Have a great rest of the week!


Monday, August 26, 2013

I'm going to Sewing Summit!!

So, pretty much the best thing happened to me last week.  It's so big, I'm still in shock over it!  You may have heard of a little ol' blog called "The Sewing Rabbit" (ha, like you haven't heard of it!).

Well, she hosted a giveaway--and the big item was a trip to Sewing Summit in Salt Lake City, UT.  Of course I entered...never imagining that I could, or would win.  

Well, somehow the stars aligned, and.....I am the lucky winner!! Look, my name is right there!! When the email came on Wednesday morning, I think my heart stopped. I read it, then re-read it, then re-read it again.  And I then I read it again.  And then I finally understood what it was saying.  And then I flipped out!!  I immediately tried to call my husband...who was in California last week for business...and is 2 hours behind, so it was 7am there.  He didn't answer.  So I called again. And again. And still no answer! Gah!!  Then I just started shrieking--OMG, I Won! I won! I WON!!  At that point my four year old and one year old were looking at me like I had grown two heads.  haha!

Finally, my husband called back, and in a rush I filled him in--he's excited for me, and maybe a bit terrified about taking on 4 out of 5 kids for four days straight--but I know he'll do great! (Baby Cecelia will be flying out with me--she's still nursing 8 billion times a day, and I doubt she'll be weaned in a month!)

So that's my big news!! Yay right?!! I'm "sew" excited to be going--it's really going to be like a dream. I have my flight info, hotel info, and class info--so I'm ready to go! Now I just need to sew up some fun stuff to take along. And figure how what to bring along with me!  Thank goodness I still have a month or so!

As if that weren't enough--my husband gave me ANOTHER surprise when he got back from California...he brought me home a new mixer.


 Not just any mixer either! A brand new Kitchenaid in Aqua Sky.  I'm in love. LOVE!  It's so pretty! And it was just in time too--we had a double birthday party this weekend, so she got put right to work, side by side by her sister...

Yep, I'm spoiled, and I know it.  The white mixer was a wedding present from my Dad..almost 9 years ago.  It still works great, but I have been lusting after a colored mixer for a few years now.  So, now to decide what to do with the white one--I definitely can't part with it--too sentimental..but hubby was talking about taking it in to have it powder coated...just have to pick a color! :)  

We celebrated my two youngest birthday's this weekend, so hopefully I'll get some party pics up on the blog soon!  I can't believe my baby girl will be one in a few days--it was bittersweet celebrating her birthday yesterday!  

Happy Monday!!