Thursday, July 12, 2012

Diapers, diapers, diapers!!

I've been crazy busy sewing up dipes for our upcoming arrival.  Just thought I would share a few of my favorites!


diaper stack
Stack of small fitteds, made from the Very Baby Cloth Diaper pattern.  Organic Bamboo velour inners and outers, with snap in soakers.
.

diaper inside
Inside of Very Baby Cloth Diaper fitted--snap in soaker
diaper outside
Outside of Very Baby Cloth Diaper fitted
IMG_9187
AI2 made from the My Little Munchkin pattern.  Berry PUL outer, suedecloth inner, and snap in soaker.
IMG_9189
Inside view of My Little Munchkin AI2
IMG_9192
Outside view of My Little Munchkin AI2
IMG_9209
A12 made from my favorite diaper pattern--the Very Baby Basic AIO.  Minkee outer (from Riley Blake's line called Sunny Happy Skies), hidden PUL, suedecloth inner, and snap in soaker.
IMG_9210
Inside view of Very Baby Baic AI2
IMG_9212
Outside view of Very Baby Basic AI2
twin dotty dipes
Twin Dotty AI2's--Very Baby Basic AIO pattern, PUL from Michael Miller, suedecloth inners.
twin dotty dipes 2
Inside of one of the twin dotty AI2's

Chevron Quilt for baby girl

So this actually wasn't made by me--but by my husband! I'm a fairly decent seamstress, and can make all sorts of clothes, diapers, etc--but quilting is a whole different ballgame! I have attempted a few quilting projects, and have found I can't cut or sew straight when it comes down to it, haha! Clothing is much more forgiving.

So I enlisted my wonderful hubby's help to make this quilt happen.  First I found  a pattern that I liked--the Ziggy Baby quilt from Cluck, Cluck, Sew.


Then I had to choose the fabrics--with no fabric stores local, I had to order online. I used Fabric.com, and they have a really handy tool that allows you to select different fabrics and view the swatches together.  Using that tool, I picked out some Kona solids--a pink, yellow, and white for the chevrons, and a print from Riley Blake's line called Sunny Happy Skies for the backing.

When my fabric arrived I prewashed, and then let hubby take over. He did all the cutting, piecing and quilting.  It took him about 2 evenings to complete.  I then squared it up, and did the binding.  I love that so much love was poured into the making of this quilt, and I hope it's something she treasures for a long time. :)


Pink & Yellow Chevron Quilt
Pink & Yellow Chevron baby quilt
Pink & Yellow Chevron Quilt 2
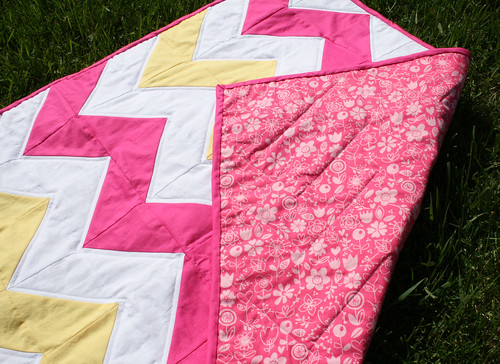
Backing--from Riley Blake's "Sunny Happy Skies" line

Dream, Sparkle, Shine wall art

dream sparkle shine
Dream, Sparkle, Shine
I wanted something big to hang above baby girl's dresser, and this is what I came up with. I saw a similar idea on Pinterest, and knew I could re-create it pretty easily. 

I started with a 2'x2' piece of birch plywood, which I primed and painted white (using latex paint).  I used this tutorial from A Step in the Journey blog to create my chevron stripes.  After a couple hours of taping, I was ready to paint on the pink (I used acrylic paint for this part).  When that dried, I found an old 8x10 frame I had, and spray painted it pink as well.  I used photoshop to make a quick little typography print, and just printed it on my home computer.  I used two sawtooth hangers to hang the chevron board, and then used a nail to hang the frame on the board--making it easy to change out the frame, or the print when I decide too.  I bent back the back of the nail with a hammer so that it wasn't poking into the wall.  Total cost of this project was around $7, which was the board (I actually bought a 4'x2' board from my local DIY center, which was $14, and I was able to get two projects from that piece)

Linking up to:

Dresser re-vamp for baby girl

Before we had even decided to try for another babe, I picked up this little dresser off the local rummage page.  I paid $20 for it, and orginally had plans of repainting it and turning it into a console for my hallway.  But when I actually saw it, I knew it would make the perfect baby dresser, and so it went down to the basement to be stored until I needed it.

Unfortunately, the only "before" picture I took was partway into the refinishing. It orginally had some very lovely 90's faux painted florals on each of the drawers.  They were some sort of sticker, and a huge pain to sand off!  So this picture is after sanding, and before priming...
IMG_8902
After sanding, before priming

I used the Sunshine prints I made as my color inspiration for the dresser.  I was able to use all paints that I already had, so this dresser make-over was pretty much free.  I did have to buy new knobs. :)  I painted the frame part of the dresser a medium grey, and then painted each drawer a color to match the prints--pink, yellow, and aqua.  I used my Silhouette cutting machine to import some of the flower graphics I had used for the prints, and turned them into cut files.  I then cut them out of vinyl, and used them as stencils to paint on the flowers on each drawer. I used acrylic paints because of their quick dry time. It was a bit time consuming and tedious, but the end result was definitely worth it.  I have a unique, custom piece for my baby girl!


dresser complete
Finished dresser!
dresser side
Side detail

Linking up to these great parties!


HookingupwithHoH shabby creek cottage

"You Are My Sunshine" prints

I can't lie--I copied these prints from a seller on Etsy.  I loved them, but they were a bit out of my budget for the three, and I knew I could make something very similar using Photoshop.  So if you are looking to buy them, please go to this shop on Etsy! :)

For my rendition, I used Adobe Photoshop, and some cute flower graphics from Ginger World on Etsy.

Baby girl artwork mockup
These prints were the start of my nursery planning, and I am really happy with how they turned out.  I had them printed at Winflash.com as matte 8x10's for around $5 (including shipping)  and they turned out wonderful.  I bought some white frames from Target for $2.99 each, and hung them above the changing table.  For less than $20 I have custom FRAMED artwork--can't beat that!

You can see the finished prints hanging in this photo:

cecelia wall

Baby Girl's "nursery"

So it's been awhile since I've updated here--but I've had good reason--I'm 33 weeks preggo with number 5, and it's a GIRL!! I have been having so much fun making stuff for baby girl, and wanted to share it.

Since this is baby #5 for us, space is getting a little limited. Our house is currently a three bedroom; and with 2 boys and 2 girls at the moment, it works great--bunk beds in each room, and they still have tons of floor space. We have plans of adding a couple more bedrooms downstairs, but they won't be finished by the time baby is due, so she will be rooming with us for awhile. Which actually makes more sense, as we co-sleep the first year anyways. :)

I have dedicated a wall in our room to baby girl, and so for now, that is her 'nursery'. I thought I would share a few pics today, and then share more detailed posts on things later this week.


cecelia wall
Baby Girl's 'nursery'

dresser complete
Dresser that I painted
dresser side
Side view of the dresser
dream sparkle shine
Dream, Sparkle, Shine wall hanging made by me
elephant sunshine
 Prints on the dresser: RWE quote print made by me, Animal balloon print from Trafalgarssquare on Etsy
elephant parade
 Elephant parade print on dresser (from same shop as above)

changing table cover
Changing pad cover I made
 I'm really pleased with how it's coming together.  Some days I really wish I had an entire room to devote to baby girl (like when I'm surfing Project Nursery!), but I know that this little space is more than enough for one little babe.  And hopefully next spring we'll have bedrooms downstairs, and then I will have an entire room to do up! :)