Friday, August 26, 2011

Pinterest, how I love thee...

If you haven't heard of Pinterest by now, you must be living under a rock! It is such an awesome site for crafting, decorating, DIY, party planning, etc. It is my newest, and best! addiction! :)

Today I knocked off a couple projects that I had pinned earlier this week.

First...my knifeblock makeover:

Saw this...
kknife131677943_jLGtb2lV_c

Made this...
Untitled-1

Love it! I started off by sanding it, then primed it with 2 coats of Krylon primer, and then topped it with 3 coats of Krylon Ocean Breeze. I'm not sure if I want to leave it as is, or rough it up with some sandpaper..or maybe add some vinyl like the pin. I'm gonna let it sit on the counter and stew on it a few days..in the meantime, it's a great improvement over the ugly pine block it was! Any suggestions would be great though!

So, the next pin I copied...

Saw this...
118067747_i6kh7cwK_c

Made this...
IMG_7840

Again, love! Wish I had some ligher orange spray paint--but Rustoleum gloss orange was all I had on hand...I do have more jars..so I may end up doing some lighter ones too! I used my Silhouette to cut out vinyl for the faces. Super easy, super cute!

Now I need to surf through my pins and find some more great projects to replicate! :)

Happy Weekend everyone!

Linking up to:

Join  us Saturdays at tatertotsandjello.com for the weekend wrap   up           party!

Wednesday, August 24, 2011

These are a few of my favorite...

ROOMS! :)

Thought I would just share a couple of my favorite rooms in my house so far. Both rooms are from from d-o-n-e, so keep that in mind. :)

First, my favorite room by far is my kitchen. It combines my favorite colors--red & aqua, and the best part is that we have done all the work in there ourselves. I know I've shown before pics on here before, but here's a quick reminder...

Before:
Kitchen before

And as it looks today:
Kitchen5

Kitchen4

Kitchen3

Kitchen2

Kitchen1

We put in new flooring--Armstrong VCT tile in Classic Black and Cool White, new countertops using white subway tile (my hubby's first tile job! He did an amazing job!), painted the cabinets white, and the walls aqua, new appliances, new hardware, sink, and faucet, and then I made the curtains. I still want to paint the window trim white, and we need baseboard trim, but I love how it's turing out so much!!

My second favorite room in my house, is our master bedroom. I haven't finished decorating yet though, so it's a work in progress--I need throw pillows, and art on the walls--I have ideas, just need time and money to implement! :)

For a color scheme, I went with the uber orginal (can you hear the sarcasm?) YELLOW & GRAY!

Bedroom1

Bedroom2

Bedroom3

I used a stencil from Cutting Edge stencils for the wall behind the bed, which really turned the wall into a work of art. My talented husband built our bed--the Farmhouse Bed from Ana White, and then I painted it white, distressed, and glazed. LOVE how this turned out soooo much. I repainted our nightstands white to match, and got a new coverlet from Target.

Hopefully I will finish this room up completely and have more pics to show later!

And lastly, not a room, but my favorite wall in my house--my faux board and batten wall:

Board&Batten

You can read how I did it here.

So that's it! Thanks for taking a sneak peek into my home!

Monday, August 22, 2011

Jackson's Monster 2nd Birthday Party

Well, it's been forever and a day since I've blogged, but I wanted to share with you all the party we threw my newly turned 2-year old son this weekend!

I had a lot of fun with his theme, and while I could have done so much more, I think it all came together awesomely! :)

First I started with his invite:

Jackson's 2nd Birthday blog copy


I used photoshop to put it together, and these monster graphics from mygraphico.com.

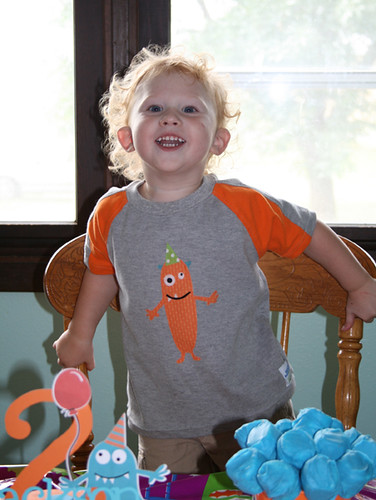
Then I had to make him a special shirt to match! ;)

IMG_7588

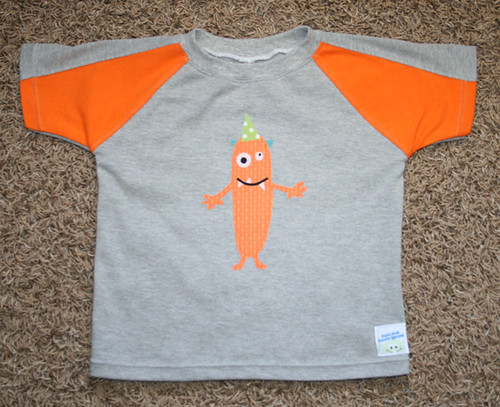
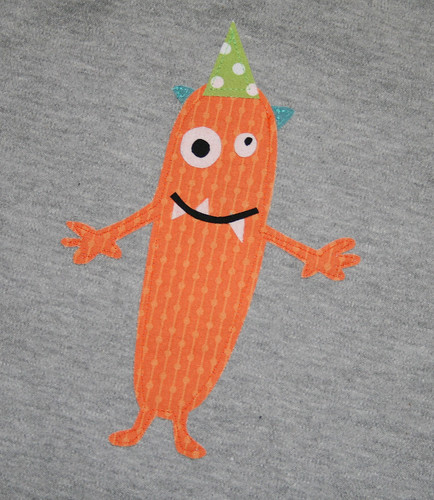
I used the Rockin' Raglan patter from Fishsticks Designs to make the shirt (using grey interlock from JoAnn's, and part of an orange halloween tee from my older sons' closet!), and then I appliqued the monster on--I created the applique from one of the monsters from mygraphico--it is super easy to do, and I love the look!

IMG_7591

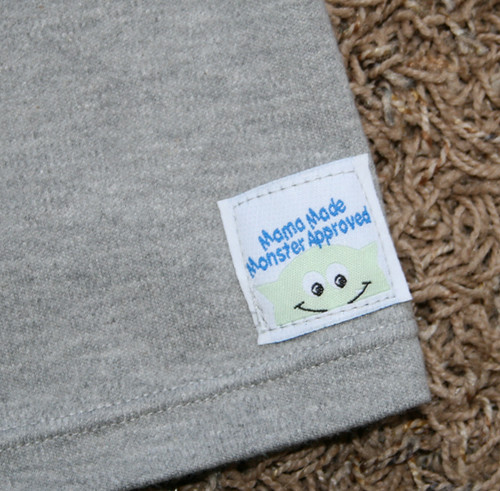
I even sewed on a matching mama-made tag!

IMG_7592

Now we move onto the actual party!

IMG_7607_1

IMG_7609_1

IMG_7639

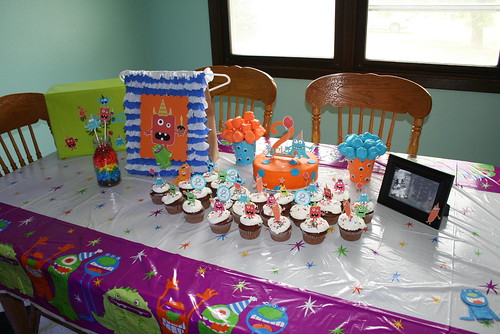
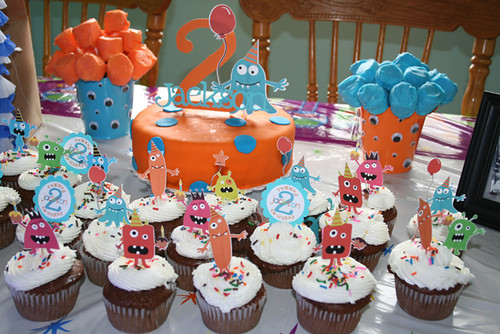
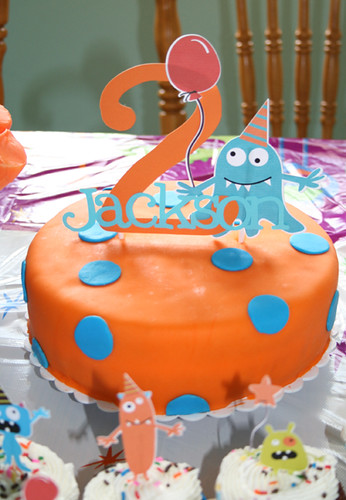
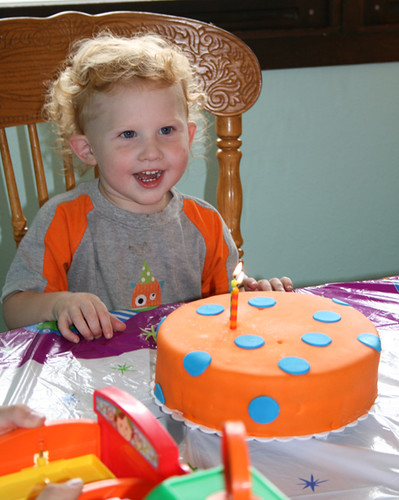
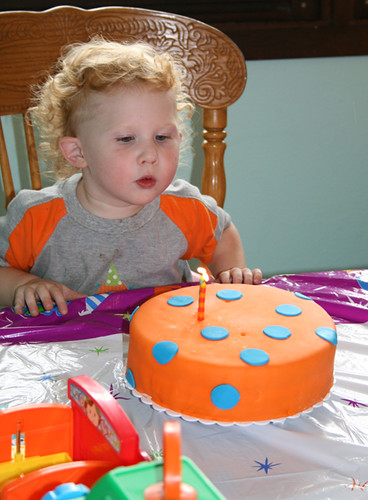
His cake--I made the cake, and my husband actually did the decorating!! He covered it with fondant--his first time ever, and I think he did a terrific job! I made the toppers using my Silhouette SD machine.

IMG_7627

IMG_7625

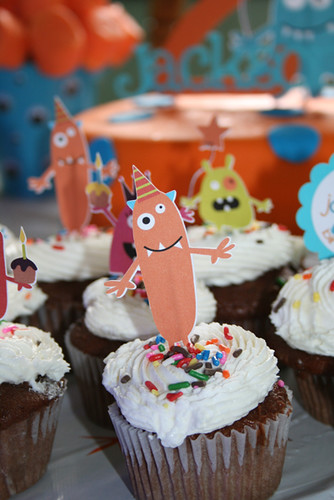
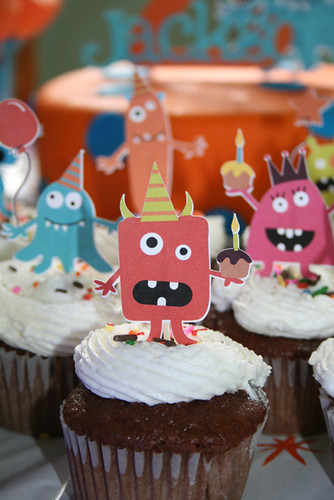
For the cupcake toppers, I used the same graphics as the invite--I imported them into my Sihouette software and turned them into print-and-cut files--LOVE my Silhouette so much and all that it is capable of!

IMG_7612_1

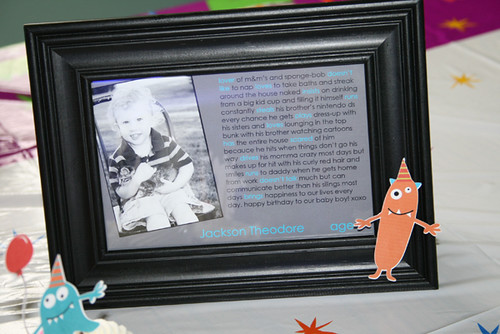
A little collage I made in Photoshop and then stuck into a cheap Walmart frame and attatched a cute little monster!

IMG_7616_1

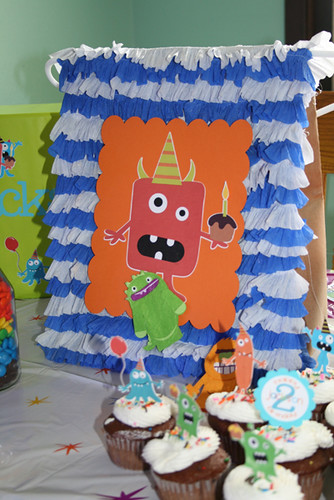
Pinata I made using the tutorial from Infarrantly Creative. So easy and the kids love it! I buy candy from the Dollar Tree and the streamers too--total cost--$6. Can't beat that! I used my Silhouette again to cut out the monster on the front.

IMG_7617_1

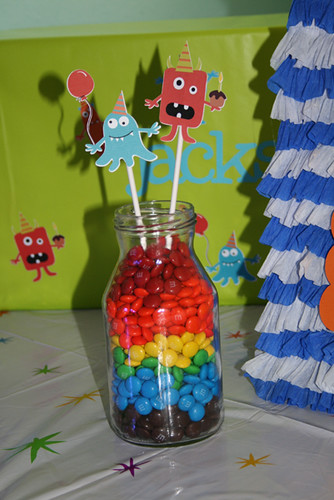
M&M's, an old salsa jar and more monster cut-outs.

IMG_7618

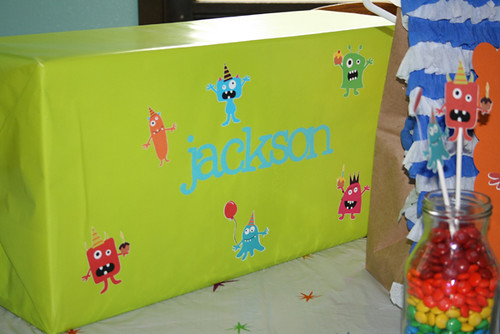
Jack's present from us (bubble lawn mower)--I jazzed up the plain green wrapping paper by printing out some of the monsters on sticker paper and then cutting them with my Silhoutte.

IMG_7628

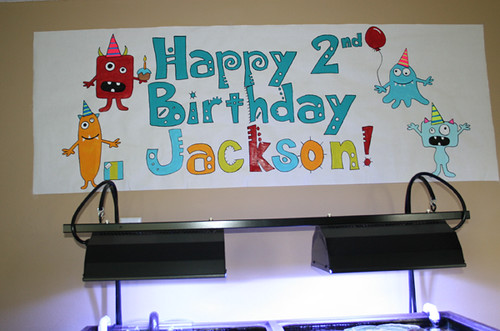
Banner made by my awesome future sister-in-law (I hope at least!).

IMG_7637_1

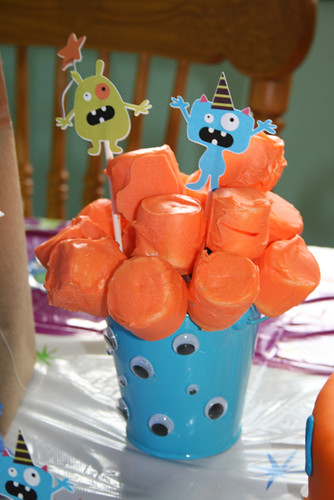
Chocolate covered marshmallows on lolli sticks. Buckets are from Target dollar section, and I hot glued on googly eyes. Super easy and effective! The kids loved these!
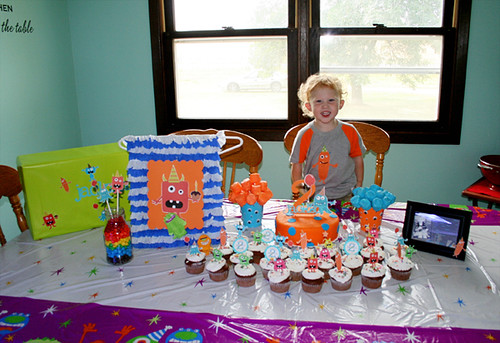
IMG_7633_1 copy

IMG_7629_1

My birthday boy!!

IMG_7686_1

IMG_7694_1

I had a great time with this party, and so did my little guy! I still can't believe my baby boy is two! I can't wait to see how he grows and changes over the next year!!

Linking up to these great parties!


border="0" href="http://tatertotsandjello.blogspot.com"
target="_blank">src="http://hadfield.smugmug.com/photos/825895175_xmTVA-O.jpg"
alt="Join us Saturdays at tatertotsandjello.com for the weekend wrap
up party!" />


http://bearrabbitbear.blogspot.com/2011/08/crafts-for-under-twenty-somethings_24.html

Tuesday, May 24, 2011

Free numbers and alphabet printables!

It has been so long since I posted!!! I have so many things I want to share too, including a master bedroom redo!! I had some spare time tonight though, and thought I would share a couple of printables I made this week. I made them to hang in the hallway by the boys room--I love fun, bright, colorful things, and even better if they are educational! :)

I of course had to spray paint some frames to match--I used Rustoleum Key Lime--not sure if I'm a fan or not, but I figured I would hang them up for a few days. Debating glazing to take off the super brightness, or just repainting my good ole' standby, aqua. Time will tell!


IMG_6412

alphabet copy

numbers copy


Here are the download links:


These are both sized as 8x10's. Enjoy!!

Thursday, March 10, 2011

Laundry Room progress (2)

I wanted to post an update on our laundry room--it's coming together soo nice! All the labor intensive stuff is done..new floor, beadboard, chair rail and base trim. The floor has even been cleaned, waxed and buffed thanks to my amazing hubby! (Flooring is Armstrong VCT tile in Classic Black and Cool White). We moved the washer and dryer upstairs a little over a week ago, and I am in heaven! Main floor laundry is soooo much better than having to go downstairs! Love love love! It was definitely worth all the work that has gone into it (mostly by hubby--not me!)

A few pics...

Looking in the door:
IMG_5692

IMG_5691

New cabinets, shelf from Menards, and glass canisters from Target. I used my Silhouette to make the Vinyl lettering. :)

IMG_5694

New toilet!

IMG_5693

I made the wreath--it's burlap, a cheap dollar store wicker wreath, and hot glue! I am hoping to post a little how-to in the next day or two. The frame was once gold, and had a nice Tuscan scene framed in it. I removed the glass, and picture, and spray painted the frame matte aluminum. LOVE!

IMG_5697

I posted about this pictures and this vinyl here.

We want to put a utility sink, mirror, and lightstrip in this corner eventually...
IMG_5700

And Dustin is also planning on putting in a countertop to the right of the dryer, so I will have a folding area! I can't wait! But for now it's useable, and that's the most important thing. It makes doing laundry just a teensy bit easier, lol.

A few notes:
Wall color: Key Lime Pie from Dutchboy
Beadboard color: Grey Whisper from Dutchboy
Flooring: VCT tile from Armstrong, Classic Black, and Cool White
Linking up to these parties:

Board and Batten Reveal!

I should have gotten this posted last week, but I just couldn't find the time to take pictures! I was crazy busy; Dustin was out of town, and I was preparing for McKenna's birthday party.

But, better late then never right?

This has probably been one of my favorite projects to date! I gave you all a sneak peak here. I am soo proud of how it turned out--this was such an ugly, blank wall before. But it has so much character now! And the best part, is I did most of the work myself! I had to have Dustin help me with the math to get the batten spacing even, but I did all the nailing, and even some of the cutting. And then I did all the painting myself too ;).

Here is the before again (this was taken as I started to paint the top half of the wall)
IMG_5388


And, as it looks today!
IMG_5717 copy


Profile view
IMG_5715 copy


I used my Silhouette and their premium frosted vinyl to cut out the words for the mirror. I had just the mirror hanging for the last few days, and it was just too blank--it needed something; and I think the frosted glass look is just perfect!
(It's hard to really capture the mirror effect--but it really is a mirror!)
IMG_5713


Speaking of the mirror--I DIY'd that as well...it started off as this:
IMG_5470

I took off the hooks, filled them in with wood putty, and then spray painted it white. I used a sanding block to lighly distress it when the paint had dried--and I really like how it looks now.


Overall, I am so happy with how this wall turned out. It has become a focal point in the house, and makes me smile everytime I walk by it. Even Dustin is impressed! :)

A few notes:

Previous wall color: Grand Hotel Mackinac Blue from Valspar
New wall color: Aqua Bay from Dutchboy
Board and Batten paint color: Ultrawhite from Dutchboy
Board and Batten materials: I originally planned on just using pine boards..but when I got to Lowe's they were out of 10' 1x4s. So I bought primed MDF instead--which was sooo nice to work with. I used 1x4's for the boards and 1x2's for the battens. Total cost was around $35.


Linking up to 1 Month 2 Win It! Wish me luck!

One Month To Win It


And